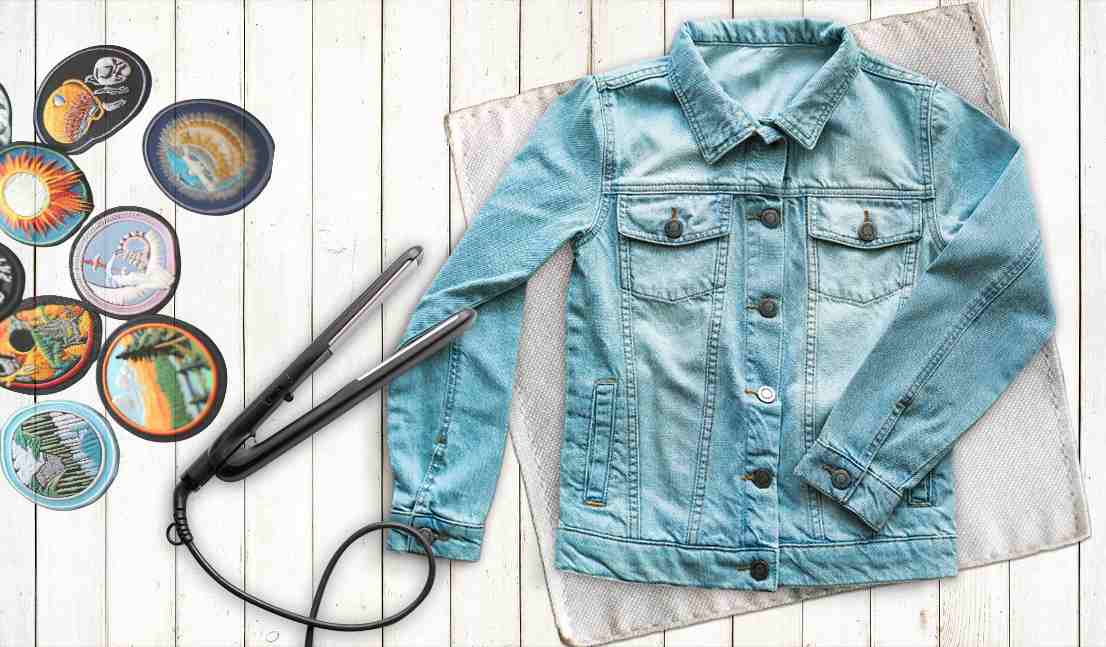
A stitch in time saves nine. With a cool patch and a hair straightener, however, you can redefine your style while saving time.
You’re about to learn the nifty trick of how to iron on patches with a hair straightener. It’s a shortcut to personalizing your wardrobe without the bulk of an iron.
This guide will walk you through the essentials: the prep work, the careful application, and the pro tips to ensure your patches adhere perfectly. You’ll find out just how easy it is to make a statement with your clothes, and you’ll do it with the precision of a stylist.
So gather your patches, plug in your straightener, and let’s get to customizing.
Key Takeways for Ironing on Patches with a Hair Straightener
Before you start, it’s crucial to check the item’s care label for ironing instructions. Ensure the fabric can handle the heat from your hair straightener.
Position the patch with the adhesive side down on your chosen garment, ideally a sturdy fabric like denim or canvas.
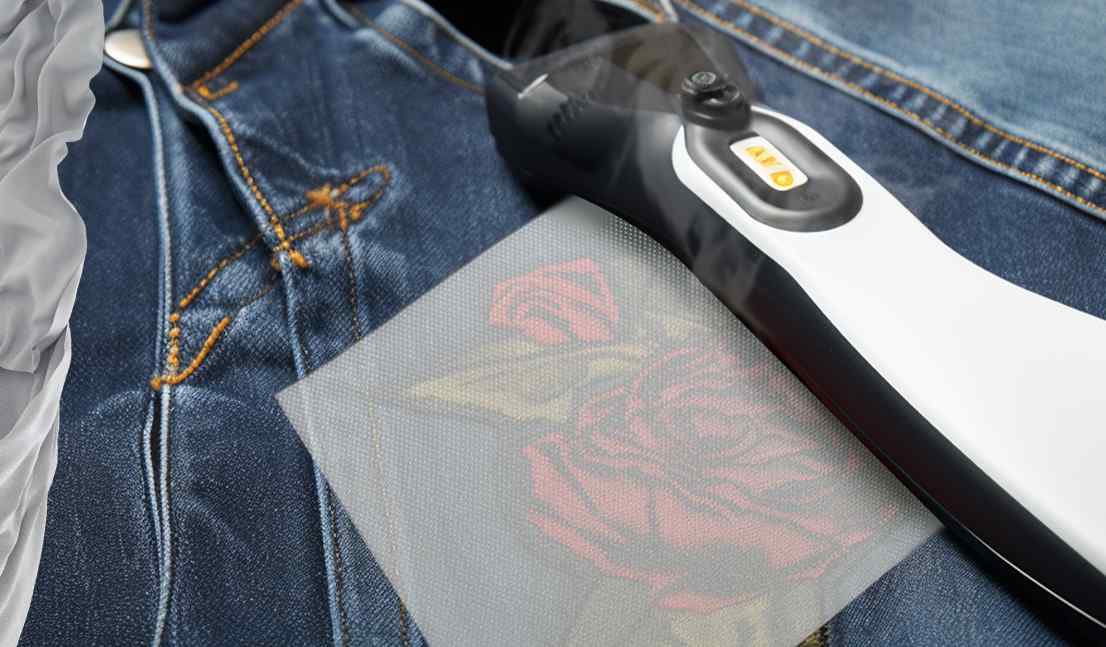
Protect your design by covering it with a thin cloth.
Now, it’s time to crank up your hair straightener to the highest heat setting suitable for the fabric. Carefully press the patch, applying firm and steady pressure for about 30 seconds.
This concentrated heat will activate the adhesive, creating a bond that melds the patch seamlessly to the fabric.
What to Do Before You Start
Before you fire up your hair straightener, gather your materials, including a hair straightener, a protective thin fabric, accessories-wholesaler patch, and the garment.
Before you begin, ensure your hair straightener is clean and free of any residue that might transfer to the fabric.
Select iron-on patches with a quality adhesive backing to ensure a secure bond.
For protection, a pressing cloth or pillowcase will serve as a barrier between the patch and the straightener’s heat. If you don’t have a dedicated pressing cloth, parchment paper can be an alternative, though it should be used cautiously.
Now, set up your workspace with a flat, heat-resistant surface. And you’re ready to embark on the transformation of your garment with precision and creativity.
How to Iron on Patches with a Hair Straightener: A Step-by-Step Guide
With everything prepared, you can start to iron on patches with a hair straightener.
1. Check your fabric
Ensure you’ve checked your item’s care tag to confirm it’s safe to iron before you start. Fabrics such as cotton or polyester are typically robust enough to withstand the heat of the iron. But it’s better to be safe than sorry. If the tag shows an iron symbol with one, two, or three dots, you’re good to go. However, steer clear of materials that may be prone to melting or damaging at high temperatures.
Before going all-in, test the edges with your hair straightener’s heat. This precautionary step ensures that your beloved garment doesn’t suffer from an unexpected mishap. A gentle press at a corner can save you from a world of regret. Trust the process and proceed with confidence once you’ve guaranteed the safety of your fabric.
2. Choose where to position the patch
Choose an ideal spot for your patch, keeping in mind both aesthetics and function. Using a tape measure, pinpoint precisely where to position your patch. Ensure it enhances your piece of clothing. If it’s a centered design, add a small dot with a fabric marker to guide placement.
Trim the patch if necessary to allow it to cover holes with at least 0.25 inches of fabric around the edges. When placing the patch, leave space for any future additions if you’re planning a collection. Make sure the adhesive side is flat against the fabric, with the edges straight, to secure a flawless finish.
Your chosen location should marry style with practicality, setting the stage for your patch’s permanent showcase.
3. Heat the hair straightener
After selecting the perfect patch spot, plug in your hair straightener. Crank it up to the appropriate temperature for your fabric’s care instructions. Remember, the goal is to activate the patch’s adhesive side without damaging the fabric. So, you’ll need to be selective with the heat setting.
If you’re unsure, start lower and gradually increase. Once the hair straightener is hot—ideally, at the highest heat setting that’s safe for the material—ensure it’s evenly heated. This step is crucial; an unevenly heated tool could result in a patch that’s only partially attached. You aim for a firm, uniform bond to withstand wear and tear.
4. Cover the patch with parchment paper
Before placing your hair straightener directly on the patch, you’ll need to cover it with a piece of parchment paper. It can protect both the patch and the fabric underneath. The parchment paper is a barrier, preventing the heat from scorching your garment or the adhesive from sticking to your hair straightener.
- Lay the parchment paper smoothly: Avoid wrinkles that could transfer to the patch.
- Ensure full coverage: The parchment should extend beyond the edges of the patch.
- Prevent slipping: Hold the parchment steady as you apply the hair straightener.
- Check the heat: The paper helps evenly distribute the heat from the hair straightener.
- Reuse cautiously: If the parchment paper becomes overly wrinkled or damp, replace it.
5. Iron the patch
Now, grab your hair straightener, preheated to its highest setting. Carefully press the heated plates directly onto the protective layer. Hold it firmly in place. Apply even pressure for about 30 seconds. Peek underneath; the edges should look well-sealed.

Next, flip the garment to expose the backside of the patch. Repeat the pressing process, ensuring the heat cements the adhesive into the fabric.
6. Cool the patch and check for adhesion
Allow your newly applied patch to cool completely before testing its adhesion by gently pulling at the edges. This step is crucial to ensuring that the patch bonds firmly to the fabric without any edges lifting. You’ve worked carefully to position and heat the patch. Now, patience is key as you let the patch cool.
Here’s what to do next:
- Wait until the patch feels cool to the touch.
- Gently tug at the corners of the patch to check for adhesion.
- If an edge lifts, reapply heat with the straightener for a few seconds.
- Ensure to cover the patch with a thin fabric while applying additional heat.
- Once the patch is fully secured, you’re ready to flaunt your updated garment.
7. Sew the patch edges (optional)
You might consider sewing the edges for extra durability, especially if the item will undergo frequent washing or heavy wear.
Grab a needle and thread that match your clothing. This attention to detail ensures seamless patch integration into your garment.
Carefully sew patch edges, employing a straight stitch or running stitch to fortify the bond. Remember that the patches have heat-activated glue on the back, but sewing adds a level of security that glue by itself can’t match.
When sewing, handle the piece of fabric gently to avoid puckering and maintain a flat, professional appearance.
This extra step is your secret to a patch that stays put through thick and thin.
What to Avoid If Ironing on Patches with a Hair Straightener Failed
When attempting to iron patches onto fabric using a hair straightener, it’s important to consider several factors to avoid any further damage or disappointment. Here’s what you need to keep in mind:
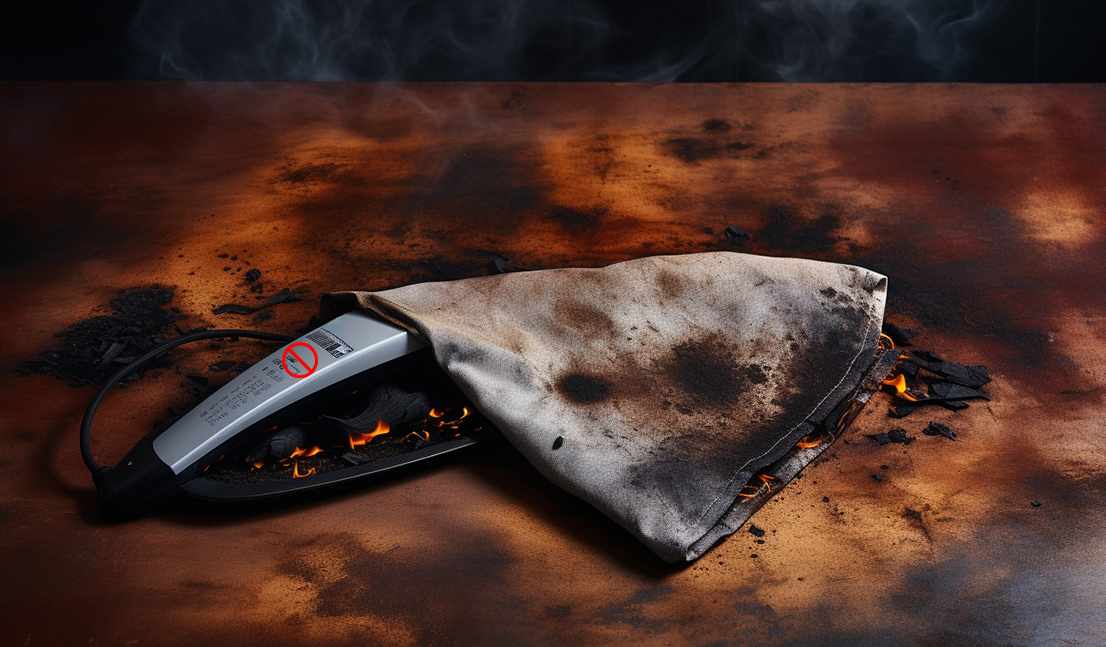
- Don’t force it: If the patch hasn’t fully adhered, don’t keep pressing. You’ll need to reassess.
- Temperature check: Ensure your hair straightener is hot enough to melt the patch’s adhesive without causing the material to scorch.
- Movement matters: You may need to move it around gently to distribute the heat evenly.
- Reposition with care: If you must move the patch, do so delicately to maintain its integrity.
- Material watch: Some fabrics can’t handle the heat; know when to hold back to avoid ruining your garment.
How to Prevent Iron-On Patches with a Hair Straightener from Peeling Off
To prevent your newly applied iron-on patches from peeling off, make sure to apply even pressure with your hair straightener. You can also consider sewing around the edges for added security.
When ironing on a patch, remember that meticulousness is key. Place a thin cloth between the patch and the straightener to shield your clothing from the heat. This not only prevents damage but also keeps the iron clean from any adhesive that might seep out.
Press firmly, but don’t overdo it. Around 30 seconds should be enough for the patch to adhere properly. Then, let it cool. For extra hold, flip the garment inside out and press for another few seconds. This technique ensures the patch is firmly in place, leaving little chance for corners to lift or edges to fray.
Conclusion
You’ve got it now! With your hair straightener in hand, you’re a DIY patch pro. Remember the key steps:
- Preheat the hair straightener.
- Press firmly on the patch.
- Don’t rush the process.
Steer clear of synthetic fabrics that can melt, and give your patches time to cool for a solid bond.
Take pride in your uniquely customized gear, knowing those patches won’t peel away anytime soon. Keep on expressing yourself with confidence and a touch of creative flair. Your wardrobe has never looked better!
Frequently Asked Questions
Can You Use a Hair Straightener to Iron on a Patch?
You can certainly use a hair straightener to attach patches. It’s a creative twist on traditional methods, providing a quick, efficient bond. Just ensure it’s hot enough, and be mindful of fabric sensitivity.
How Do You Apply Iron on Patches Without an Iron?
You can use a hair straightener as an alternative to an iron for applying patches. Just heat it up, place the patch, cover it with a cloth, and press firmly for half a minute.
Can You Use a Hair Dryer to Iron on Patches?
You can’t effectively use a hair dryer for iron-on patches. It lacks the necessary heat and pressure. Instead, a hair straightener or traditional iron is required to securely adhere the patch.
What Setting Do You Heat Press Iron on Patches?
You’ll heat press iron-on patches at the highest heat setting that your fabric can tolerate—usually between medium and high for most materials—avoiding any steam features to ensure a solid bond.